
Courtesy of Larry Pletcher
Charleville Musket
Firing
and
Cleaning
Revolutionary War Musket
The "Revolutionary" Charleville
Charleville Musket
Charleville Muzzle-Loading Musket
Charleville Flintlock
Musket
Charleville Lore
"The Model 1766 Charleville is based on the first regulation French military musket -- the so-called Model of 1717. The Pedersoli (Italy) reproduction features a European walnut fullstock 57 1/2" long with satin finish, 2 1/2" drop and 13 1/4" trigger pull. [Steel] barrel is armory bright .69 caliber smoothbore, round tapered 1.300" at breech to .840" at muzzle. [In comparison, Brown Bess is .75 caliber with .69 caliber ball.] Flintlock uses 1" [1" wide x 11/8 " long] flints . All steel furniture is armory bright, [steel] lockplate is marked "Charleville." Steel ramrod with trumpet shaped head and 10x32 thread. Gun is 60" in overall length and weighs 10 1/2 lbs. Load with 80 grains* FFg black powder and patched .680 round ball." Dixie Gun Works [Note: Model 1766 {Light model 1763} Charleville normally came equipped with a button-head ramrod. Trumpet shape usually came with Model 1763 or 1773-77 Charlevilles. Common that current suppliers also provide Model 1777 bayonets (with center locking band; although not generally supplied by the French to the colonists, the French fighting alongside the colonists did have them on their Model 1777 Charlevilles). Also, at Yorktown the Americans were using a .643 ball called a #19 ball, as there were 19 balls per pound of lead. At 16 ounces per pound, this puts one of these balls at 0.84 ounce or almost 1 ounce.
Note: Webmaster's Pedersoli 1766 Charleville [with 1763 or 1773-1777 trumpet shaped ramrod] is 60 inches long and weighs 10.4 pounds. With 1777 bayonet, it is 77 inches long and weighs 11.2 pounds. George Neuman, in his book Battle Weapons of the American Revolution, states "The Model 1763 was quickly found to be too heavy. This revised 1766 Pattern kept the basic configuration but reduced its original weight." He lists the 1763 Charleville as being 9.2 lbs and the 1766 Charleville as being 8.5 lbs.
Notes: According to the following site ( http://www.littlegun.info/arme%20francaise/collection%20fusils/a%20a%20collection%20fusils%20tir%20fr.htm), the Charleville used a .65 caliber ball with over 154-185 grains of "musket" powder for the cartridge (included priming powder). It's been reported that Hoyem's History and Development of Small Arms Ammunition says that around 1776, the French muskets were of .69 caliber, with ball diameter of .63, and powder charge of 189 grains, 10 grains of which were used for priming. Maximum effective range: 100 to 200 yards max; average effective range 50 to 75 yards (see more on weapon ranges below). Fortification designers planned on "musket shot" range of 300 yards regardless of inaccuracy. Beware: widely varying claims exist for the correlation between current black powder and Rev War era "musket" powder. After its powder was emptied into the barrel, a paper cartridge with ball enclosed was rammed down the barrel, ball first, acting both as wadding and ball stabilizer (for better accuracy), similar to the patch mentioned above by Dixie Gun Works. While Washington's troops at Yorktown used a bore #19 ball (19 balls per pound) with .643 caliber, this size ball (then made at the Fifth Street Laboratory in Philadelphia) is hard to find. G. Eddie May has sold .648 caliber (16 gauge shotgun) round balls for the great price of 20 cents each (postage extra). You can contact Eddie for current pricing for this and other sizes at 706-581-8225. Eddie's mailing address is 159 Ridley Rd, Chatsworth, GA 30705-5757.
Firing musket videos:
Shooting the 1766
Charleville Musket
Charleville 1766 Tips
West Point Flintlock Video
Revolutionary War
Soldier Explaining [Charleville] Flintlock Musket
Firing a Musket:
18th-Century Small Arms
Revolutionary War
Musket Bunker Hill July
2009
Why a
musket???
Why a
musket??? part
2
Musket Firing at Concord
Brown Bess Musket -- Three Shots in
46 Seconds*
Brown Bess vs the
Charleville Musket
Charleville Accuracy Test
How to Fire Brown Bess
Musket -- English Heritage
Firing a
Flintlock Musket
Loading and Firing a
Musket
Lexington
Concord Battle Road Minute Man National Park
Rifle and
Musket Demonstration
at Valley Forge
Revolutionary War Re-enactment [2005
at Cantigny- Wheaton, IL]
The American Revolution in 4
breathtaking minutes!
Bullet-making 1
Bullet-making 2
Cartridge-making
Reenactment
Cartridge-making
Slow motion video of musket firing upon breastplate
Note difference in Rev War vs. later method of
putting ball into barrel and in determining rate of fire. Those claiming
five shots per minute usually started with a loaded musket and jammed the ramrod
into the ground as opposed to returning it to its slot in the musket between
firings. Best otherwise is four shots per minute. Brown Bess* expert above
almost makes the rate of four shots per minute (starting unloaded, 3 shots in 46 seconds is
3.913 shots per minute). Perhaps the four shots per minute rate, per some
familiar with smoothbore history, is that the soldier likely used an undersized
ball and did not use wadding, so nothing was needed other than to drop a ball
down the barrel after pouring in the powder (no wadding or ramrodding
required) and stomping the butt on the ground. This is also said to
possibly explain the Loyalist loss at Kings
Mountain: they were shooting downhill, and the balls would fall out,
necessitating the slower reload time with wadding (counter-argument is that
fouling would have prevented the balls from rolling out). Usual firing rate with
wadding is three shots or even just two shots
per minute (view Brown Bess Musket -- Three shots in 46 seconds (again, starting
unloaded)). One expert remembers reading that
during
the War of 1812, the British standard procedure was to not bother priming the
pan. The ball traveling down the barrel when loading will force powder out of
the vent into the pan, so with both procedures (no wadding/rodding & no
priming), perhaps four shots per minute was possible for many soldiers. Washington Post says 3 shots/minute and accurate to 55 yards. One expert [Allen Guelzo] claims the "inverse," that, in the
fog of war (smoke-filled, anxiety-ridden battlefields), it was more likely that
a soldier would fire one shot every three to five minutes. Remember
that soldiers would not only be on the move but watching their comrades die
beside them. Colonel
Light Horse Harry Lee in his memoirs admiringly describes an American regiment
at Brandywine which fired 30 rounds per man in 45 minutes (0.66 rounds per
minute or 1.5 minutes per round). Comparatively in the best of
circumstances, rifles might fire one shot per minute with frequent barrel
fouling due to powder residue build-up. Common for musketeers to fire
three shots and then charge with the bayonet to hopefully make the enemy break,
run, or otherwise flee the field.
Mathew Spring's research says the British preferred to
close to within 75 yards of the enemy, fire a volley, and then charge with the
bayonet (what amounted to a modified pike or spear). In the time it took an opponent to reload, well-trained soldiers
could outrun the range of a musket. These tactics brought them victory more often than not. Realize that the tactics at the time were a result of the technology available,
with tactics normally following but sometimes inspiring technology.
The musket was a "point and shoot" weapon, known more for its volume than
accuracy of fire (similar to today's 2-pound lighter M-16). Washington
even ordered the front sites of the Charlevilles removed to reduce his soldiers'
temptation to aim, which took time away from producing deadly walls of balls,
where it was the weight of lead, not the accuracy, that carried the day.
(See Comparative Accuracy Notes near the bottom of the page)
As well as the walls of lead, massed firing also intimidated through
concentrated noise. Keeping musketeers close together allowed for effective voice commands given on
a noisy field of battle, when half the battle would be fought in well-timed
(often after the other side had discharged its weapons and before it could
reload) and cohesive bayonet charges much like Greek phalanx attacks.
Thus battlefields were chosen for their cleared, deforested, unobstructed, and
even land. Through both bullets and bayonets, victory went to the side which could drive its opponent from the field.
As a side note, in the 1977 edition of "The Shooter's Bible," G.M. Horn wrote that, at Lexington
and Concord, only one bullet in 300 found its mark and that only one man out of
15 (6.6%) hit anyone. National Park Service statistics show that a Rev War
soldier had a 98% chance of coming out of the average battle alive (but, if
wounded, only a 75% chance of coming out of an army hospital alive)! Other
info: misfire rate is commonly reported to be between 1 out of every five
or six shots on average (18%), though some muskets hardly ever misfire:
the flint is properly set, with neither its underside or the frizzen being
sooty, and the touch hole being free of obstruction.
Adjusting for all the "windages," it might be fair to say that, as a
general rule, a rifle was twice
as accurate as a musket, but could only be fired at half the rate and, unless it
had a rare, specialized socket-bayonet, was useless as as a spear or pike,
and with its slender stock, only lasted so long as a club before it was ruined
as a weapon.
NB:
From Dr. Jerry D. Morelock's
"Washington
as Strategist: Compound Warfare in the American Revolution, 1775-1783" in
"Compound Warfare: That Fatal Knot"
"Conventional
battles between regular forces in the eighteenth century were generally
characterized by parallel lines of troops (hence the term linear tactics;
"firing en masse at a mass"). These
troops faced each other with muskets and bayonets across a distance that was
often only a few hundred (or even a few dozen) yards. Constrained by the
technology of the era
– epitomized
by the use of inaccurate, smoothbore muskets
–
an army seeking victory depended upon troops drilled to stand in massed ranks
and deliver volley after volley of massed fire into its opponent’s lines until
one side or the other could advance as an unbroken battle line with fixed
bayonets to finish off the enemy. Generally, it took about two years of
intensive training and constant drilling to produce a soldier capable of
executing the intricate maneuvers required for this automaton-like fighting (to
underscore this fact, Frederick II the Great, King of Prussia, and the master of
linear tactics, referred to his soldiers as “walking muskets”). The difficulty,
even impossibility, of irregularly trained and indifferently drilled militia
troops executing these tactics is obvious."
NB: From Paul Lockhart's
"Firepower: How Weapons Shaped Warfare"
"One seemingly minor innovation had a measurable [no pun intended] impact
on the musket's rate of fire: the self-contained cartridge. This, too,
came from the fertile military culture of Gustavus Adolphus's Sweden." ...
"The flintlock, muzzle-loading, smoothbore musket, with triangular bayonet,
would remain the main weapon of the European (and American) infantryman from the
early 1700s to around 1840." ... "For an experienced musketeer, the whole
process of loading and firing took twenty seconds or less, making possible a
rate of fire of about three (or more rounds per minute." ... "It was
possible to fire even faster per minute, at least so long as the musket remained
clean. French soldiers were trained to fire four to five rounds per minute
with the flintlocks. In Prussia at the time of the soldier-kings Frederick
William I (r. 1713-1740) and his more famous son Frederick the Great (r.
1740-1786), speed loading became an obsession. The Prussians introduced a
double-ended, heavy iron ramrod for their muskets, sparing each soldier the
awkward motion of twirling the ramrod over his head before inserting it into the
muzzle, and thereby saving maybe a second or two in the process. In the
1780s, they introduced a musket with a conical venthole, so that powder from the
breech could actually flow backward through the vent and into the priming pan—a
self-priming musket, in other words. So it's possible that eighteenth-century
musketeers could fire as fast as five rounds per minute—the musket loaded,
raised, aimed, and fired in the space of twelve seconds—but that could hardly be
sustained in combat." ... "Three rounds per minute is probably a good overall
estimate."
NB: From Arthur S.
Lefkowitz's "George Washington's Revenge"
"A reasonable estimate is that an expert rifleman armed with an American long
rifle could hit a target at 250 yards. In camparison, the smoothbore musket,
which had no grooves (rifling) had an effective range of 100 yards. Claims
that American long rifles had a range of up to 400 yards may be based on firing
modern reproduction weapons using high-quality black powder."
Firing:
For reenactment cartridges for most modern-made
replica muskets, consider using no ball with 60-100 grains of black powder,
likely 3FFFG for extra smoke. 85 grain cartridges will work fine for
reenacting.
Note: Charleville pistols, like most pistols, max at 75 grains per
cartridge for safe reenacting.
Maximum allowable per safety officer usually ranges somewhere between 110 and
120 grains.
Check first with your safety officer!!!
Do not use modern smokeless powder!!
Note: If a pound of powder is 7,000 grains, then, with 100
grains/shot-cartridge, a pound can of powder should yield 70 shots. At 85
grains/shot, a pound powder can should yield 82 shots. If 20 each 85 grain
shots were used per battle, with four battles per event, a two-day, four-battle
event would require a pound of powder.
Instructions and video of cartridge assembly:
Video of cartridge with
ball.
Video of reenactment cartridge-making .
Discussion of firing buck and ball.
For firing with ball, use only what musket manual states, likely FF Grade (not FFFG) powder in proper amount!
Before firing, assemble flint jaw and install flint
(with leather or (preferably) lead holder) with sharp forward edge aligned so
that it will squarely meet the top 1/3 of closed frizzen to generate sufficient
spark. This may mean that you have to invert the flint. Consider
carrying a nail in your cartridge box should you need need to field-adjust the
flint jaw. [On average a flint may last 30 shots without knapping.
At 15 shots per battle, this may last you a two-day event.]
Ensure that left side of flint will not hit barrel when trigger pulled.
Tighten jaw so that flint will not slip.
Video of fitting gun
flint.
Study in article by Black Powder Magazine found no difference using lead versus
leather as far as producing better spark.
Note: Wide variation in flint use. Replacement may be needed in as few as 20 shots or as many as 150 shots. Common to see 60 to 100 shots per flint, with knapping as required after every battle's 10-16 shots.
Charleville 1766 Musket Sling

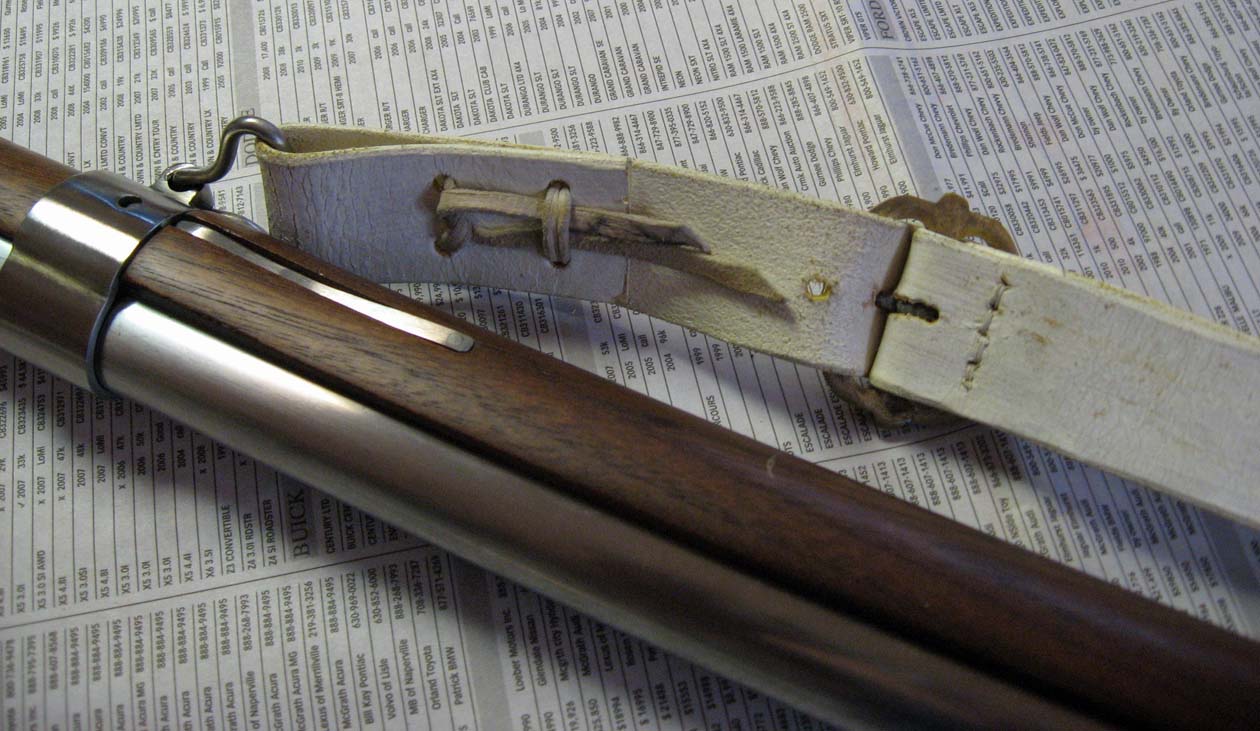
One-piece sling in photo above employs full-frame buckle. Can be made tight and
adjusted for length, but with some difficulty.

One-piece sling in photo above employs
full-frame buckle with
prong/tongue removed to allow tight sling with slightly quicker lengthening and shortening.
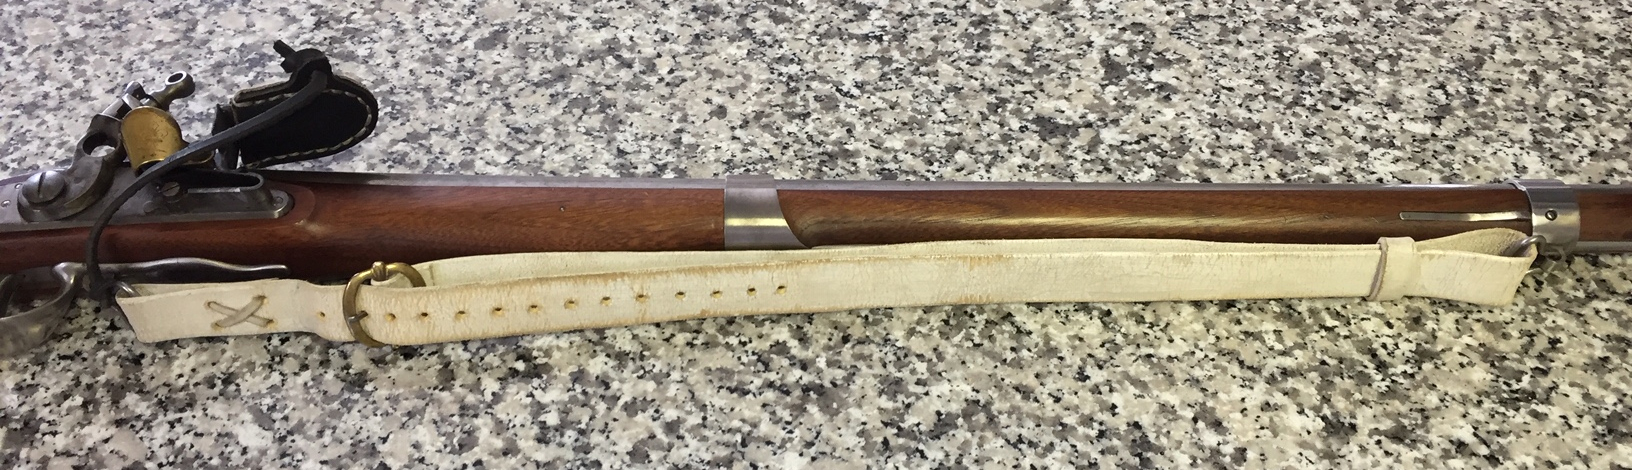
One-piece sling in photo above employs full-frame buckle with
prong/tongue (strung in the manner of a D/half-frame buckle), allowing
near-tightness and quick adjustment.
When removing barrel for cleaning, fully loosened sling will allow swiveled band
to slip over end of barrel, saving disassembly of sling by trigger guard.
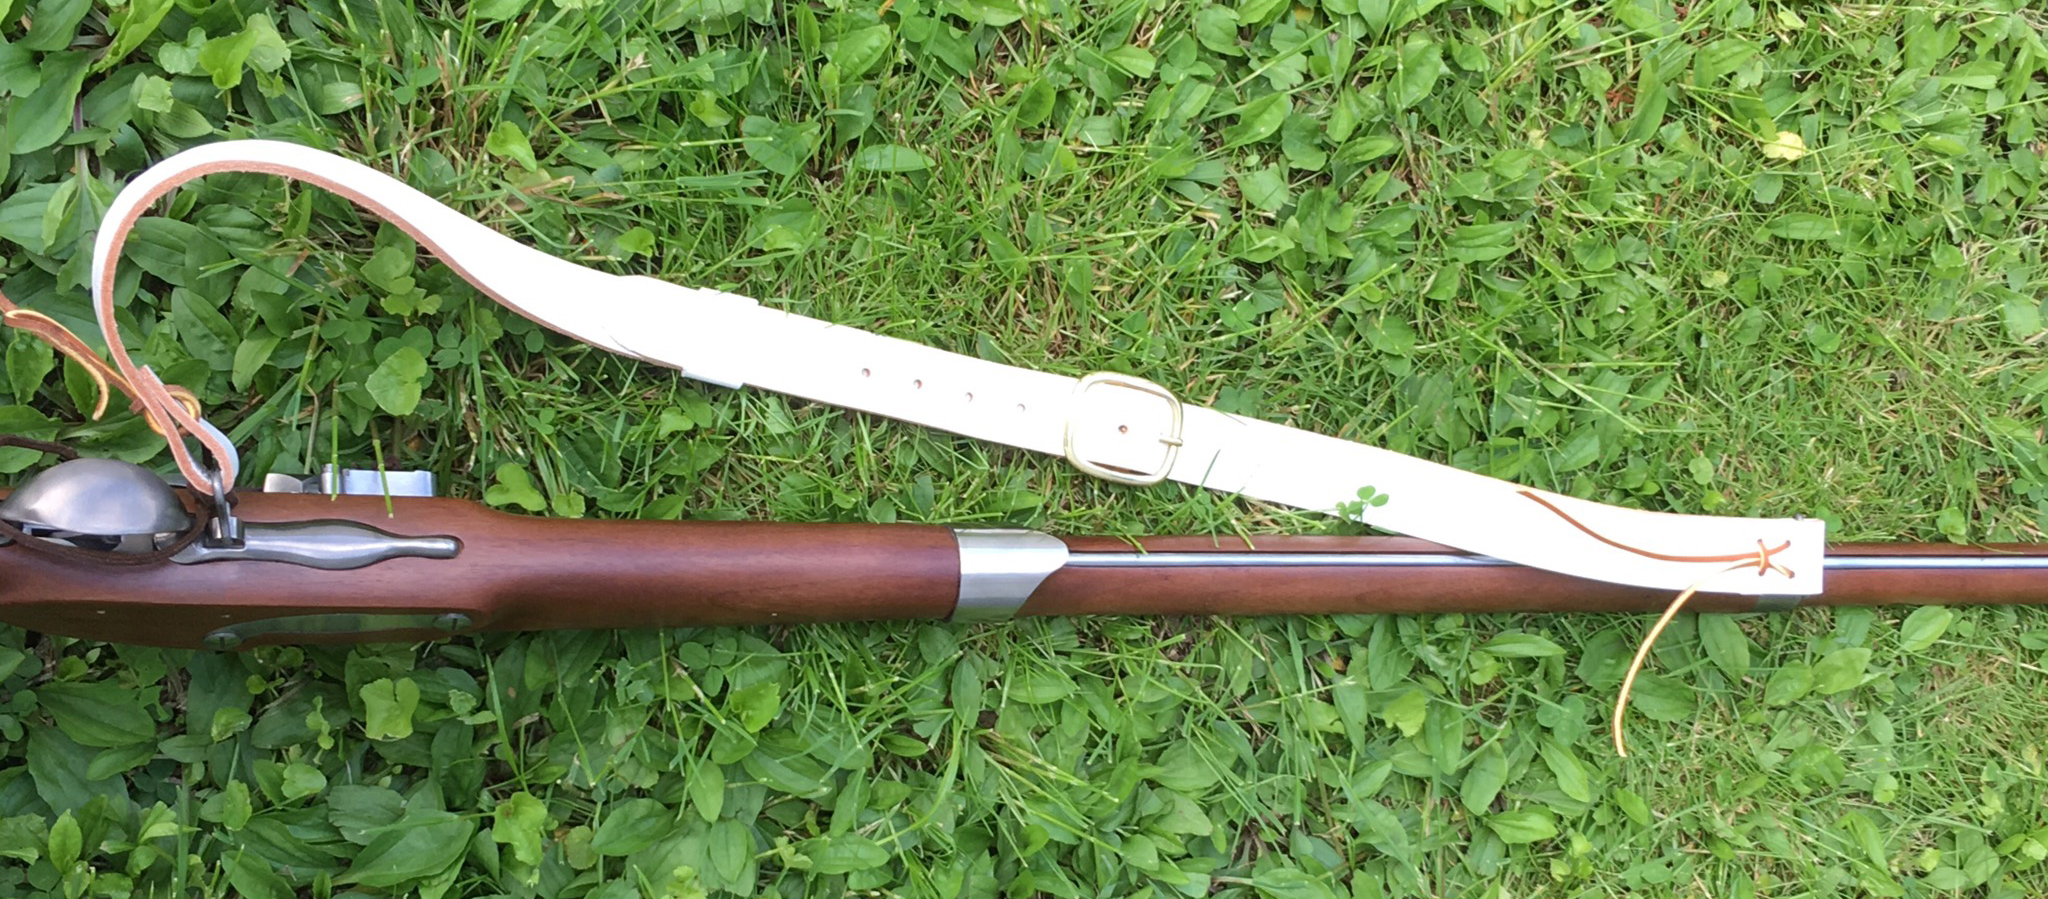
Two-piece sling with long ties outside for easy viewing/adjusting. Thanks to
Brian Herkalo!
Click here for supplier
Cleaning
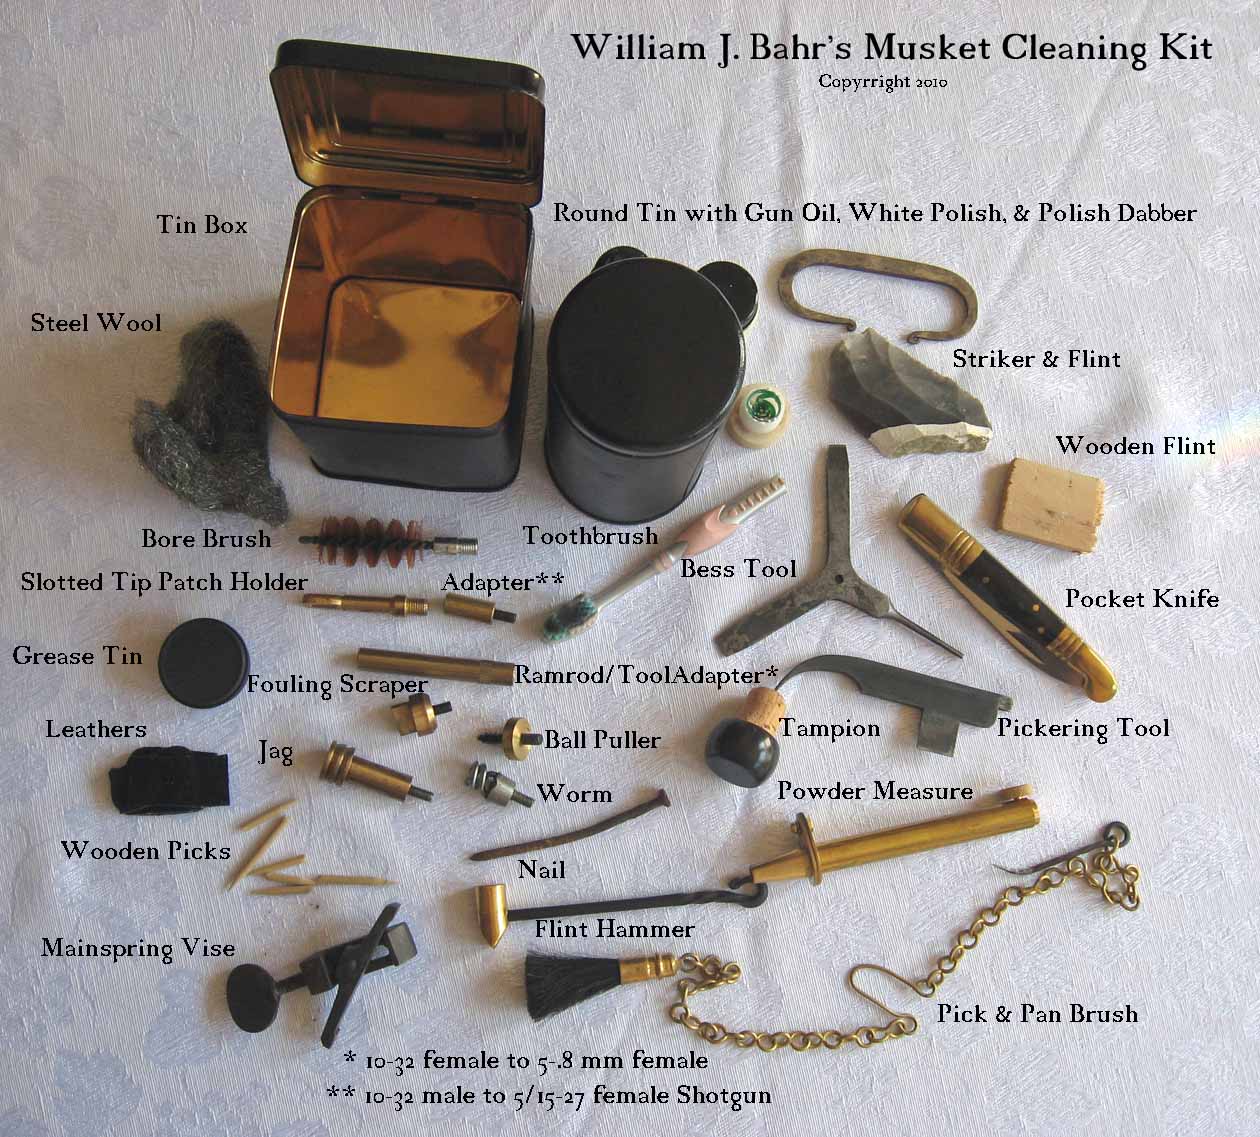
Musket Cleaning Kit
Charleville 1766 Lock
Failure to keep your musket clean, dry, and
lubricated will quickly lead to pitting from corrosive gun powder, rusting from
the weather, and extra wear due to added friction. After each battle in an
event (series or weekend of battles), use a pick & pan brush and clean towel to
remove powder residue from lock, stock, and barrel. At the end of the day,
if a bucket of water is available, you may want to disassemble your musket into
basic parts by removing the appropriate screws and bands. Immerse the lock
and clean it with a toothbrush and cotton swab, as you move the hammer through
its positions. Dry thoroughly and lightly oil. Put the touch hole end of
the barrel into the bucket and pour water down the barrel, doing your best to
clean it along the lines of the thorough barrel cleaning procedure outlined
below, or minimally by pumping water through the barrel by using the ramrod with
cleaning patches and then drying. If you don't have a bucket but do have a
canteen full of water, consider the following field cleaning method: 1.
Disassemble the musket into lock, stock, and barrel. 2. Put a plug
into the vent hole of the barrel and then pour water down the barrel, filling
the barrel and leaning it against something so that it remains upright. If
you don't separate the barrel from the stock (as might be the case with a more
difficult to disassemble Brown Bess or rifle), ensure that the vent hole is not
leaking; otherwise the leaking corrosive liquid will stain your stock. 3.
With a damp rag, clean the lock and then the stock, putting on a light coat of
oil (olive oil is said to have been used during the Revolutionary War). 4.
Clean the barrel as best you can; before drying, turn the barrel upside down to
let as much water as possible to drip out; then dry and clean the barrel by
running the ramrod with clean patches; when patches come out clean, add oil to
the patches to oil the inside of the barrel; then lightly oil the outside of the
barrel. 5. Reassemble the lock, stock, and barrel.
And why not enjoy listening to a Rev War music CD while cleaning your
musket?
At the end of each event, clean your musket as above but using hot, soapy water
to remove the sooty powder residue. Also remove the hammer from the lock
(cock it if needed) and clean and grease behind it. Also, loosen the
flashguard screw and clean behind the flashguard. Be sure to use
properly-sized screwdrivers so as not to strip the unusually small-sized screw
slots. Use Liquid Wrench if screws prove difficult to turn. Be
careful; replacement parts are not inexpensive!
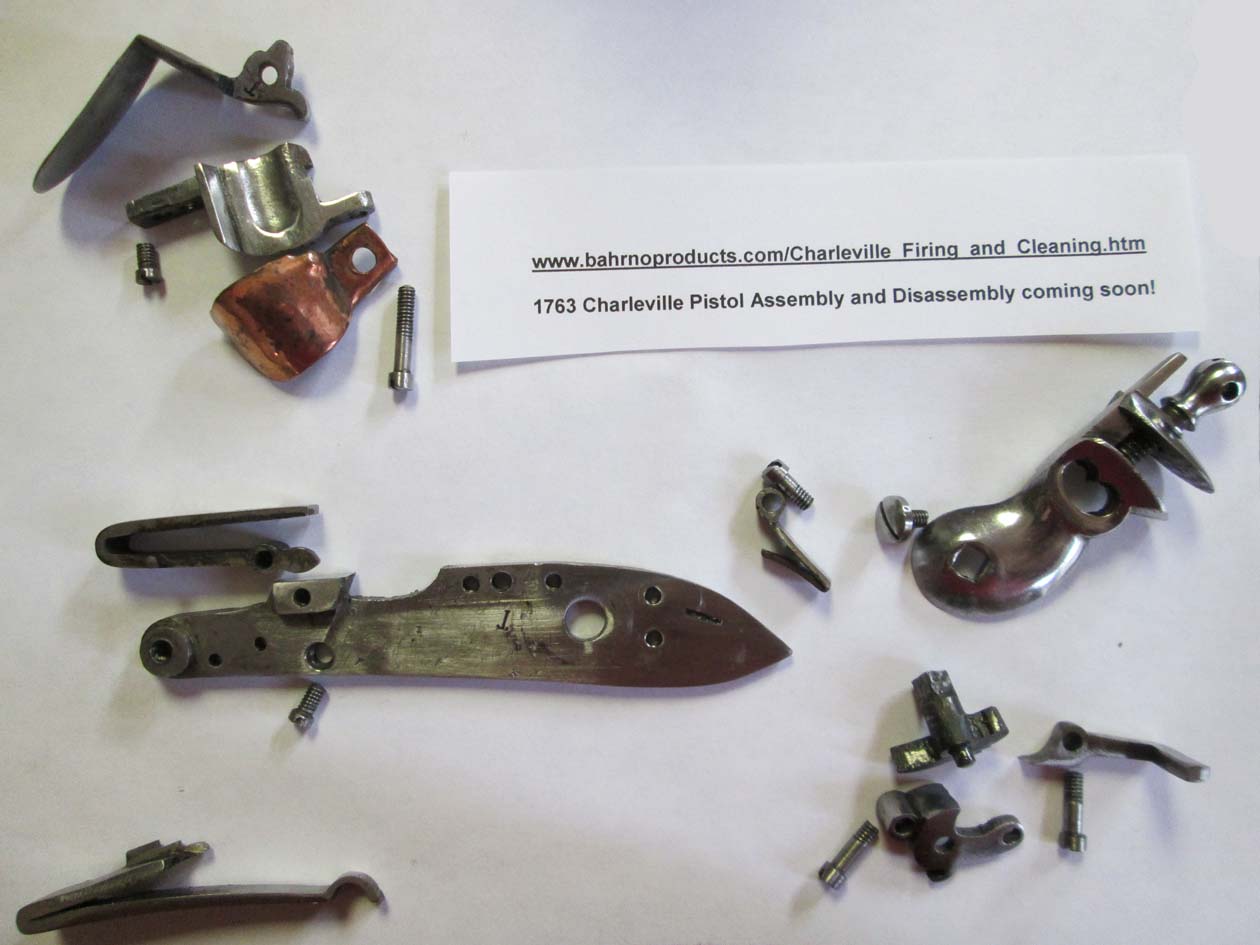
For thorough lock cleaning after each season, first remove lock
from stock (unscrew two lock screws), then disassemble lock (see below).
Best to use a pan to keep parts together; be especially sure to cover drains and
floor vents to prevent losing any part you might drop. After disassembly, immerse
lock parts in hot (preferably soapy) water.
Use toothbrush, toothpick, Q-tip and/or cotton swab to clean crevices. Often
rubbing the steel with an oiled cloth is enough to remove firing stains. Use
fine steel wool or carefully/gently use very fine sandpaper (220 grit) to remove
rust. OTOH, you can use a brass brush, which won't remove the finish, or,
like the Rev War soldiers, use brick dust or emery powder mixed with sweet oil
(olive oil) . But no need to overdo it. Unless you belong to a French unit honor guard
with gleaming muskets, you'll want your musket to age gracefully. Rinse with hot, clean water. Dry (use blow
dryer if desired to avoid rust in tight spaces), then lightly oil, then
reassemble (see below).
Note: for those not able to frequently and thoroughly clean their locks,
consider lubricating the moving lock parts with marine trailer wheel bearing
grease. Such grease is water resistant and allows dunking the lock in
water to quickly remove most powder residue but with minimal rust effects.
Note: Place loose screws on a saucer or in a container to avoid losing
them. If cleaning in or near a sink, place screen over the drain to avoid
lost parts. Also best to use an area where parts can be easily seen and
dropped parts easily found. Use good, properly-fitting screwdrivers so as not to strip
expensive screw heads.


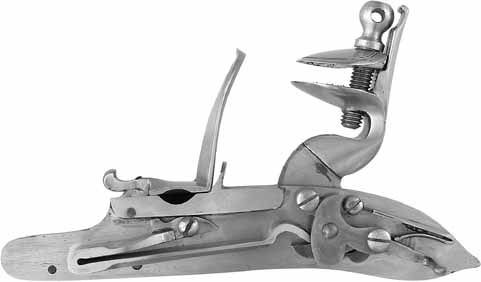
Note: Photos show lock uncocked.
Here is a quick list to disassemble
lock (Pedersoli
reproduction model pictured above):
1. (Before removing from stock,) put the lock into the half-cock position (allows for easier removal of
mainspring & reassembly of hammer).
2. Unscrew the jaw from the hammer.
3. Remove Q (hammer) screw and P (washer, if applicable)
4. Remove K (thick head, medium screw, medium shank) and J
(medium/feather spring; compress first using vise).
5. Remove N (flashguard and feather spring screw - long
screw, long shank (unthreaded portion)) and L (frizzen).
6. Remove I (small screw, no shank) holding H (pan
assembly).
7. Remove G (small screw, medium shank) holding small/sear spring.
8. Compress Mainspring Vise on A (main spring) to release D
(bridle), B (tumbler), and C (sear). You are
advised not to remove the main spring's screw.
9. Remove E2 (medium screw, medium shank-more thread) and E1 (medium
screw, large shank-less thread).
10. Release and remove Mainspring Vise.
Not counting any flint, washer, or flashguard (parts
extra from the manufacturer) and with the hammer disassembled, you should have 18 separate parts in hand.
Clean, dry, and lightly oil (removing excess) lock parts as advised above.
Note: Photos show lock uncocked.
To assemble/reassemble lock (Pedersoli reproduction model):
1. Compress main spring A using Mainspring Vise (and possibly large
pliers to help get started if you have a smaller vise (best to have vise handle
on top, smaller part of spring)) to allow for insertion of
B
(tumbler).
2. Insert B (tumbler) into position pictured.
3. Insert D (bridle), screwing down with E2
(medium screw, medium shank-more thread).
Do not confuse E2
with E1 (less thread) or K, which has a slightly thicker head, is slightly smaller, and
has fewer threads.
4. Insert C (sear), screwing down with E1
(medium screw, large shank). Uncompress main spring A.
5. Insert G (small screw, medium shank) through sear spring
F and screw partially into hole; compress spring with heavy thumb pressure,
inserting spring edge into slot, then tighten G while fully inserting
spring into slot.
6. Insert H (pan assembly) and screw down with I (small
screw, no shank).
7. Insert and compress feather spring J and screw down with K
(thick head, medium screw, medium shank).
8. Compress J (feather spring) with Mainspring Vise and position
frizzen L and flashguard M, screwing down with N
(long screw, long shank). Release vise.
9. Grease (marine grease best, considering event cleaning with water) underside of hammer O , place hammer on square,
pull back
one position to half-cocked so that the hammer can be correctly attached, adding
P (if required), and screwing down with Q (with its underside
greased).
Ensure that screw is tight enough so that hammer does not wiggle sideways in
half-cocked position (a point of troop inspection).
10. Seat lock in stock. If necessary adjust trigger to facilitate
seating. Screw down lock with the two stock screws.
11. Assemble flint jaw and install flint (with leather or lead holder)
with sharp forward edge aligned so that it will squarely meet top 1/3 of closed frizzen.
Note: flint may need to be turned "upside down" ( to meet top 1/3 of closed frizzen.
Ensure that left side of flint will not hit barrel when trigger pulled.
Beware: flint is sharp and can cut flesh easily!
12. If not using soon, store in uncocked position, with frizzen open, and
with flint jaw/cap loosened. If storing with flint loose in jaw, be sure
to tighten the flint jaw before heading to the field to avoid misfiring or
losing the flint altogether.
Alternate/original term translation:
cap =
jaw; cock = hammer; hammer, steel, or battery = frizzen
Disassembly/cleaning/assembly may take about an hour.
For thorough barrel cleaning after each event,
1. Remove the barrel from the stock and put the touch-hole end of the barrel into a bucket of hot, soapy water.
2. Holding the end of the barrel near vertical, pour soapy water down the
barrel a number of times, with the water exiting from the touch-hole.
3. Having put the Ramrod Tool Adapter on the ramrod, attach in turn the
(12 gauge shotgun bore) Brush, Jag, and Fouling Scraper, running each down the barrel
several times, gently twisting the Fouling Scraper in a clockwise. If gets
stuck, do not turn counter-clockwise too many time to risk losing it.
4. Attach the Slotted Tip Patch Holder or the Worm to the ramrod, and run
one or two cleaning patches
(2.5 inch sq or appropriately free-handed) down the barrel, pulling up
soapy water on the up-strokes.
5. Remove the ramrod and pour clean hot water down the barrel until the
water from the touch-hole runs clean.
6. Make additional clean patch runs with the ramrod until the patches show
absolutely no black powder residue.
7. Put a new, lightly-oiled cleaning patch on the ram road and oil the
barrel.
8. Lightly oil the outside of the barrel.
Note: before battle, some prefer to run a clean patch down the barrel to
remove any oil and enhance powder flow down the barrel.
For thorough stock cleaning after each event, use a clean, moist rag,
drying and finishing-up with a light oil. Some prefer linseed oil.
Before putting your musket into storage at the end of the season, remove
and oil/polish the leather sling and then remove and clean/oil the trigger
mechanism. Reassemble.
For rust removal, use a brass brush, steel wool, or a period brick dust compound (or very
carefully use very fine sandpaper/emory-cloth, minimum 220 grit), then oil.
Cleaning after each event may take about half an hour.
Notes:
1. Don't forget to keep all screw threads
lubricated, especially after cleaning with water.
This includes machine screws, threaded tools, ramrods, etc.
2. Tie a cleaning rag to your cartridge box to clean your musket
immediately after firing.
3. When possible, after cleaning intricate parts with water, use a hair
dryer to make sure parts are completely dry to avoid rusting.
See photo below as to why you need to clean your musket (courtesy of NWTA)
And perhaps their flints weren't sharp? Here's a nice video on an easy way to sharpen/knap flint (in a vise). Click on link below:
https://www.youtube.com/watch?v=JQx_xBhpQt0&ab_channel=capandball
Using knapping hammer to knap on the run
Also make sure your flint is properly seated in the flint jaw. Make sure to give the flint the greatest stroke over the frizzen, perhaps turning the flint "upside down" in the jaw to maximize sparks.
Caveat lector: reader beware!
While the author is happy to share this best-to-his-knowledge information and
appreciates your reading it, he can assume no responsibility for how you put it
to use.
The appearance of links to/from other sites does not imply endorsement.
Feedback and corrections are always welcome!
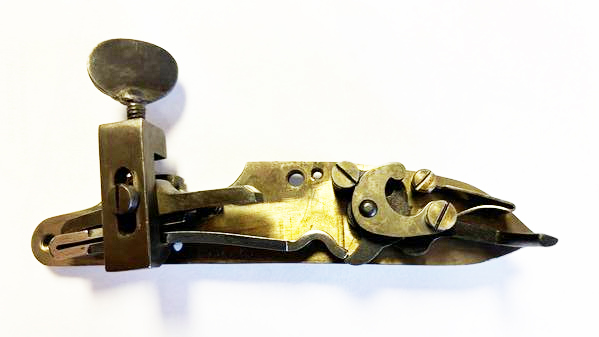
Note: Here are photos of locks from a Brown Bess musket (courtesy of Track of the Wolf) and a Charleville 1763 pistol. Here's a link to Brown Bess cleaning.


Here is a quick list to disassemble (Charlesville pistol
reproduction model pictured above):
1. Put the lock into the half-cock position (allows for easier removal of
mainspring & reassembly of hammer).
2. Unscrew the jaw from the hammer.
3. Remove Q (hammer) screw and P (washer, if applicable)
4. Compress J
(medium/feather spring) using vice.
5. Remove N (flashguard and feather spring screw - long
screw, long shank (unthreaded portion)) and L (frizzen).
6. Compress Mainspring Vise on A (main spring) and remove A to release D
(bridle), B (tumbler), and C (sear).
7. Remove screw which was hidden by the mainspring to remove J
(feather spring).
7. Remove I (small screw, no shank) holding H (pan
assembly).
8. Remove G (small screw, medium shank) holding small/sear spring.
9. Remove E2 (medium screw, medium shank) and E1 (medium
screw, large shank).
Clean, dry, and oil lock parts as advised above.
To assemble/reassemble (Charlesville pistol reproduction model
pictured above):
1. Insert screw to attach J (feather spring).
2. Insert B (tumbler) into position pictured.
3. Insert D (bridle), screwing down with E2
(medium screw, medium shank).
4. Insert C (sear), screwing down with E1
(medium screw, medium shank).
5. Insert G (small screw, medium shank) through sear spring
F and screw partially into hole; compress spring with heavy thumb pressure
or pliers,
inserting spring edge into slot, then tighten G while fully inserting
spring into slot.
6. Insert and uncompress main spring A.
7. Insert H (pan assembly) and screw down with I (small
screw, no shank).
8. Compress J (feather spring) with Mainspring Vise and position
frizzen L and flashguard M, screwing down with N
(long screw, long shank).
9. Grease underside of hammer O , place hammer on square, pull back
one position to half-cocked so that the hammer can be correctly attached, adding
P (if required), and screwing down with Q (with its underside
greased).
Ensure that screw is tight enough so that hammer does not wiggle sideways in
half-cocked position (a point of troop inspection).
10. Assemble flint jaw and install flint (with leather or lead holder)
with sharp forward edge aligned so that it will squarely meet top 1/3 of closed
frizzen.
Note: flint may need to be turned upside down to meet top 1/3 of closed
frizzen.
Ensure that left side of flint will not hit barrel when trigger pulled.
Beware: flint is sharp and can cut flesh easily!
11. If not using soon, store in uncocked position, with frizzen open, and
with flint jaw/cap loosened. If storing with flint loose in jaw, be sure
to tighten the flint jaw before heading to the field to avoid misfiring or
losing the flint altogether.
Alternate/original term translation:
cap =
jaw; cock = hammer; hammer, steel, or battery = frizzen
Click for action
Season 3, Episode 5: "Hypocrisy,
Fraud, and Tyranny"
Click for youtube action
Copyright 2011-2025 W Bahr
Musket Slings, Flints, and Accessories (Vendor)
Pedersoli 1766 Charleville Musket Parts
Dangerous Muzzleloading Practices
Gunflint Sharpening Gunflint Sharpening Gunflint Sharpening
Gunflint Making 1 Gunflint Making 2
"If you have a hard frizzen and matched main and feather springs, a flint will last 100 strikes." Al Potyen, experienced reenactor, 2VA Regt, NWTA
National Park Service's 18th Century Musket Manual -- Belatedly discovered on 11/17/13 ; numerous topics; very interesting!!
Flintlock Safety and Other Tips
Flintlock FAQs
Field Cleaning
of Musket Video
Flintlock Field Cleaning
Video
Five Guns
You Need Too Know From The American Revolution
Flintlock Parts More Flintlock Parts
Pedersoli Pedersoli Instructions
Cleaning and Care for
Flintlocks
From Bright Steel to
Brown: The Colour of British Musket Barrels, 1755-1865
Vendors:
Dixie Gun Works,
Jarnagin,
Jas. Townsend and Son,
Loyalist Arms ,
Track of the Wolf
Note: It has been said that, even when
made-in-India Charleville muskets are of good quality and relatively inexpensive,
standard replacement parts are not available. Please let us know if
otherwise.
"Hanger [British Colonel] is emphatic that never in his life did he see better rifles than those made in America or men who shot better. “They are made,” he says, “in Lancaster and two or three neighbouring towns in that vicinity in Pennsylvania. The barrels weigh about six pounds two or three ounces, carry a ball no larger than thirty-six to the pound, and are three feet three inches long. I have often asked what was the most they thought they could do with their rifle. They have replied that they thought they were generally sure of splitting a man’s head at 200 yards, for so they termed their hitting the head. I have also asked several whether they could hit a man at 400 yards. They have replied certainly, or shoot very near him,”[3] as indeed is evinced by Hanger’s anecdote. Supposed requirement for joining Daniel Morgan's (Virginia) Riflemen was to be able to hit an orange at 300 yards. Another reported requirement was being able to hit a 7" square at 250 yards. Supposedly, renowned rifleman Timothy Murphy, upon prompting by Benedict Arnold and Daniel Morgan, fired four shots at British Brigadier General Simon Fraser, who was leading a critical reconnaissance in force over 300 yards away. Murphy is said to have brought him down on the third shot. Murphy is also said to have brought down Sir Francis Clerke, aide-de-camp to General Burgoyne, as he rode upon the field to deliver orders from Burgoyne to fall back, orders that never reached the intended commanders, all leading to the British surrender at Saratoga.
Note: As astounding as it was then, according to Wikipedia, modern snipers with specialized gear have killed at up to and slightly over 2 miles in range (2 times the 1760 yards in a mile), about 9 times the 400 yard distance of Rev War marksmen! https://en.wikipedia.org/wiki/Longest_recorded_sniper_kills
"Hanger contrasts the American rifle with the British Brown Bess: “I do maintain that no man was ever killed at 200 yards by a common soldier’s musket by the person who aimed at him. A soldier’s musket, if not exceeding badly bored and very crooked as many are, will strike the figure of a man at 80 yards; it may even at 100 yards; but a soldier must be very unfortunate indeed who shall be wounded by a common musket at 150 yards, provided his antagonist aims at him; and as to firing at a man at 200 yards with a common musket, you may just as well fire at the moon and have the same hopes of hitting your object.”[4]"
Note: To achieve this accuracy, musket barrels were rifled. Barrel lengths for Rev War rifles varied from 32 to over 48 inches. Calibers were .25 to .62, with .40 to .48 cal most common. The rifling twist depended on the bore, with the larger the bore the slower the twist. One turn/twist in 48 inches would be good for around .40 cal. A .62 cal Jaeger would be one in 70 inches. So, figuring a 48 inch barrel, a .40 caliber might have 1 complete turn, and a .62 caliber would have 69% of a turn. More info on rifles. https://en.wikipedia.org/wiki/Long_rifle
Note: As regards the concepts of aiming a "firelock," as observed by Don Hollway in a discourse on matchlocks: "In fact to take aim and shoot a specific person on purpose, even on the battlefield, was considered murder, but if you aimed at a whole bunch of them and happened to hit one of them, that was an act of God." Ref: https://www.quora.com/What-type-of-musket-was-used-during-the-time-period-of-Alexandre-Dumas-The-Three-Musketeers/answer/Don-Hollway Referenced video of matchlock firing (1-2 shots/minute): https://www.youtube.com/watch?v=2KTS8PQ06Qo&feature=emb_err_woyt
The Amazing Ferguson Breech-loading Rifle
Note: The six-foot English longbow was made of hew wood and had a draw weight of between 80 and 150 pounds. Its effective range was between 200 and 400 yards, nominally 350 yards. It is said that some could send arrows up to 650 yards (500 meters).
Note: According to a Civil War reenactor: A smoothbore musket has an effective range of 75-100 yards. He also said that it took 16 pounds of lead to kill a man. As mentioned above, a Charleville ball weighed around .84 ounces, yielding 19 shots in 16 pounds. 16 pounds to kill a man? Hard to believe, well unless he was several 200+ hundred yards out!!! The same reenactor said a 0.58 caliber Minieball (rifled) has an effective range of 300-900 yards when using 61-65 grains of 2 or 3F powder, when yielding 3 aimed shots per minute.
Note: Here is some recently acquired
musket range/accuracy information from Alex Burns that I have not yet processed:
https://kabinettskriege.blogspot.com/2018/01/how-close-ranged-were-mid-eighteenth.html
and, of possible interest:
https://kabinettskriege.blogspot.com/2021/03/grenades-in-mid-eighteenth-century.html
More information
Gunpowder
constituents: 15% charcoal, 10% sulfur, and 75% saltpeter. Sulfur (yellow/gold)
burns at a relatively low temperature (sort of like kindling), carbon (black) is
the main fuel, and saltpeter (gray) is the oxidizer, the intense source of
oxygen, the ignition accelerant. Not an accident is that black, gray, and gold
are the school colors of the United States Military Academy at West Point.
See more farther below.
Tactics are outgrowths
of technology. With the advent of gunpowder and the use of the musket as a
weapon, battlefields were now smoky and noisy. Leaders needed to maintain
control, via drums, bugles, and keeping their men close. Musket firing in
volleys maintained the speed of loading and firing. The psychological effect of
a round of mass fire, where many inaccurate muskets managed to hit at least
something in an effort to shock and awe, was followed either immediately or
after several more rounds by a massed bayonet charge. The speed of firing and
cohesive unit movement was a critical focus of Prussian army drill. [Military
tactics later changed with the advent of the rifled musket and Minie ball for
speed and accuracy, allowing for dispersion of units, with soldiers now more
often able to move independently as seen in America’s Civil War.] Note: P 54:
The author writes, “Under the best possible conditions, a well-trained and
well-supplied soldier could load and shoot four or five times per minute.” While
it is said that a well-trained Prussian soldier (someone who spent many years
practicing) could get off rounds up to six times a minute, some of the very best
modern-day Rev War reenactors can barely make four times per minute. Many times
in battle involving unit movement, a soldier would be lucky to get off one round
per minute.
"GUN OF THE DAY-French Model 1768 Flintlock Musket"
"The U.S. Pattern 1795 musket [Springfield] was based on this French model. This New
Hampshire-marked musket was imported in October, 1776 and saw service with
Edward Cox, a journeyman farmer who enlisted with his brother, John, in the 2nd
Regiment [VA], Continental Army.
John Parker's "musket" has been identified as a fowling piece, not a Charleville as per Lexington statue above.
BTW, the
French Charleville .69
caliber muskets were first presented to George Washington by Lafayette. One
estimate of Lafayette's deliveries is 25,000 Charlevilles. The US later
commissioned the 1795 Springfield musket based upon the Charleville design. The
Springfields are the crossed muskets which have become the US Infantry
insignia.
* Gunpowder historical note from Wikipedia: "At least since antiquity, grains of wheat or barley were used by Mediterranean traders to define units of mass; along with other seeds, especially those of the carob tree. According to a longstanding tradition, 1 carat (the mass of a carob seed) was equivalent to the weight of 4 wheat grains or 3 barleycorns.[7]:95 Since the weights of these seeds are highly variable, especially that of the cereals as a function of moisture, this is a convention more than an absolute law.[29]:120–1" An avoirdupois/international pound is defined as 7000 grains [previously 1 London/English pound = 7200 grains powder]. Gunpowder grades: F for Fine, the more F's, the finer (eg. Fg = coarse grain; FFg = medium grain; FFFg = fine grain; the "g" designation stands for sporting (shooter's) grade). Also gunpowder mixed with water could substitute in hard times for ink. Mixed with rum, it did the job for making tatoos. Gunpowder, the earliest known explosive and invented in the 800's in China, is comprised of charcoal (black), sulfur (gold), and potassium nitrate (gray). Black, gold, and gray are the colors for the United States Military Academy at West Point.
Other notes: The flintlock was likely invented by Marin le Bourgeoys (1550-1634). Flintlocks were first used by fusiliers (fusil = French for gun, primarily a flintlock), who with this new safer-around-powder-than-matchlocks, were assigned to guard dangerous, powder-laden artillery and baggage trains; fusiliers were often awarded distinctive hats to wear. Muskets were mostly military issue. A fowler smoothbore (fowling piece) was essentially a shotgun used by civilians primarily for waterfowl (birds). In many cases, Brown Besses left over from the French and Indian War were sawed off to make shotguns for hunting. Various size pellets were made for various game, to ensure the maximum probability of downing the game by adjusting size and number of shot. Rifles were usually .25 to .6 caliber (.42 to .48 most common) with the stock covering most, if not all, of the barrel (not allowing an easy attachment for a bayonet, which even if it worked may have obstructed the sight, negating the main advantage of the rifle). Rifle bore was also too small for a plug bayonet; need at least 50 caliber to hold a decent bayonet. Some rifles even had octagonal barrels (commonly made bar iron blanks in octagonal form didn't need to be further forged/turned/rounded and were easier to drill and groove, due to easier centering and gripping), making retrofit to hold a bayonet even harder. Thus, riflemen who were reloading were prime targets for bayonet charges. Riflemen took advantage of the long range of the rifle both in war and peace. Herds of prey at a distance could not detect the rifle report and would likely not scatter after the first of them went down. Immigrant German craftsmen, familiar with the Jaeger (hunter) rifles used in Germany, produced the longer, smaller-caliber Pennsylvania and Kentucky long rifles, ideal for American frontier use. For rifle barrel making, check out this website: http://www.flintriflesmith.com/ToolsandTechniques/barrel_making.htm
More notes: Rule-of-thumb Ranges: Musket: 50-100 yards Rifle 200 yards. Rifles 2-4x more range than musket. Quite often many more bayonet wounds than ball wounds.
Note: Before the
Socket Bayonet was Plug Bayonet (bayonet handle fit into the barrel of fowling piece):

Revolutionary War Muskets & Rifles
1760 yards in a mile. 176 yards in a tenth of a mile. 440 yards in a quarter
mile.
The US Department of Defense: Effective range is “The maximum distance at which
a weapon may be expected to be accurate and achieve the desired result.” What
this means in any specific situation is arguable.
Smoothbore musket: Maximum effective range: 100 to 200 yards. Average effective
range: 50 to 75 yards.
Don't fire until you see the whites of their eyes (30 yards? See link
below.).
The smoothbore musket generally allowed no more than 300 yards with any
accuracy. Fortification designers planned on "musket shot" range of 300 yards
regardless of inaccuracy.
The maximum range of the bullet was 1,200 yards.
Rule of thumb for smoothbore effective range: 50-100 yards.
Massed firing control: In the time it took an opponent to reload (1-4
shots/minute) well-trained soldiers could outrun the range of a musket.
Therefore, Important for commanders to develop effective firing and
bayonet-rushing strategies.
Supposed requirement for joining Daniel Morgan's (Virginia, American
Revolutionary War) Riflemen was to be able to hit an orange at 300 yards. One
reported requirement was being able to hit a 7" square at 250 yards. A few
marksmen were able to hit targets at 400 yards.
Longbow effective range 200-400 yards, nominally 350 yards, while some could
send arrows up to 650 yards.
TAKE NOTICE: According to the
Journal of
the American Revolution, the background "Take Notice" poster was not of
Revolutionary War origin
but came from the mobilization for the "Quasi-War" with France in 1798.
Click here to view a set of "Take
Notice" Manual of Arms products.
Suggestions, click here to send email.
Original work © 2017-2025, W. Bahr
Return to Reenactment Cover Page
Grand Union
If you like this type of information, you'll love:
View Revolutionary War Reenactment YouTube Playlist (30+ YouTubes) click:

Also:
From Quora: How long did it take for a soldier during the American Revolution to reload a rifle?
"For rifles, probably 1 shot/minute or a 60 second reload time until barrel fouling occurred. 0 to 6 shots/minute for muskets. 6, supposedly by well-trained Prussians. 0 shots/minute for a scared militiaman. This results in an undefined (division by 0) answer for the militaman and a 10 second reload time (almost unbelievable) by a well-trained Prussian (possibly for Hessians as well, but then again, they spent their lives practicing). Modern-day videos show a British reenactor barely making 4 shots per minute or a 15 second reload time. Various tricks can move the shots up to 5 shots/minute (12 seconds). One trick is to start the clock with the first shot, not with its load. Another trick is with ramrods: not reseating them but stabbing them nearby into the ground. Of course, the best times above are likely not met in actual, “fog of war” battlefield conditions with the weapon on the move. More information at Charleville Musket Firing and Cleaning "
Revolutionary War Weapons Don't fire until you see the whites of their eyes (30 yards?)
Inaccuracy of Muskets Round Ball to Jaw Lead Flintlock Flint Holder How Washington Got His Gun Powder Production of Gunpowder During the American Revolution or Production of Gunpowder During the American Revolution
Musket ball 5th Street Laboratory (Philadelphia Armory) Philadelphia Armory Post Rev War Musket Ball Making Von Steuben, Valley Forge, & Drill
Reviews of Revolutionary War Books and More
NB: See my comments to second link above: I might mention the following: 1. Flattening can go quicker with a larger hammer. 2. I stop pounding on my .68 - .64 caliber (for Charleville) round ball when the smashed lead is about 2 inches in diameter. 3. After cutting out the outlined holder and folding it, as you've done, I also add a small triangular notch in the middle of the back of the fold, so that the holder can easily center on the jaw screw. 4. Once I'm satisfied with the results (proof is in the pudding), I make several holders at one time, in order to have ready spares that I keep in my cartridge box along with a couple extra flints.
NB: Comparison: .75 inch = 19.1 millimeter .69 inch caliber = 17.5 millimeter .45 inch caliber = 11.4 millimeter .35 inch caliber = 9 millimeter
Also:
08/31/25: Continued from above: 4YI, about the United States Military Academy at West Point's school colors: Black (carbon), Gray (saltpeter, potassium nitrate), Gold (sulfur)
The chemical reaction of gunpowder
10KNO3 + 3S + 8C → 2K2CO3 +3K2SO4 + 6CO2 + 5N2
REF: https://www.chemistryislife.com/the-chemistry-of-gunpowder
From ChatGPT5:
WJB: What makes gunpowder explosive?
ChatGPT said:
Gunpowder (also called black powder) is explosive because of the way its ingredients chemically react when ignited.
It’s a mixture, not a compound, of three main parts:
Saltpeter (potassium nitrate, KNO₃) – supplies oxygen.
Charcoal (mostly carbon) – fuel.
Sulfur – lowers ignition temperature and increases the speed of combustion.
Here’s why it explodes:
So, the explosiveness comes from:
From
"American Military Shoulder Arms, Vol. 1: Colonial and Revolutionary War Arms"
by George D. Moller, University Press of Colorado, 1993: Laboratory on
Fifth Street: 037.8S. (info thanks to Allen Ockerlander of 2VA)
The Laboratory of Fifth street was uperintended by Perigrine Jones and
fabricated musket and pistol ammunition. Fortunately, its production information
has survived in the U.S. Archives, and its production of musket ammunition is
summarized as follows:
Musket Cartridge Production (chart shows month and year of production for
1780-1783. Notes that 17 bore (rounds per pound) was for .75 caliber
muskets (Brown Bess) and 19 bore (rounds per pound) was for .69 caliber muskets
(Charleville).
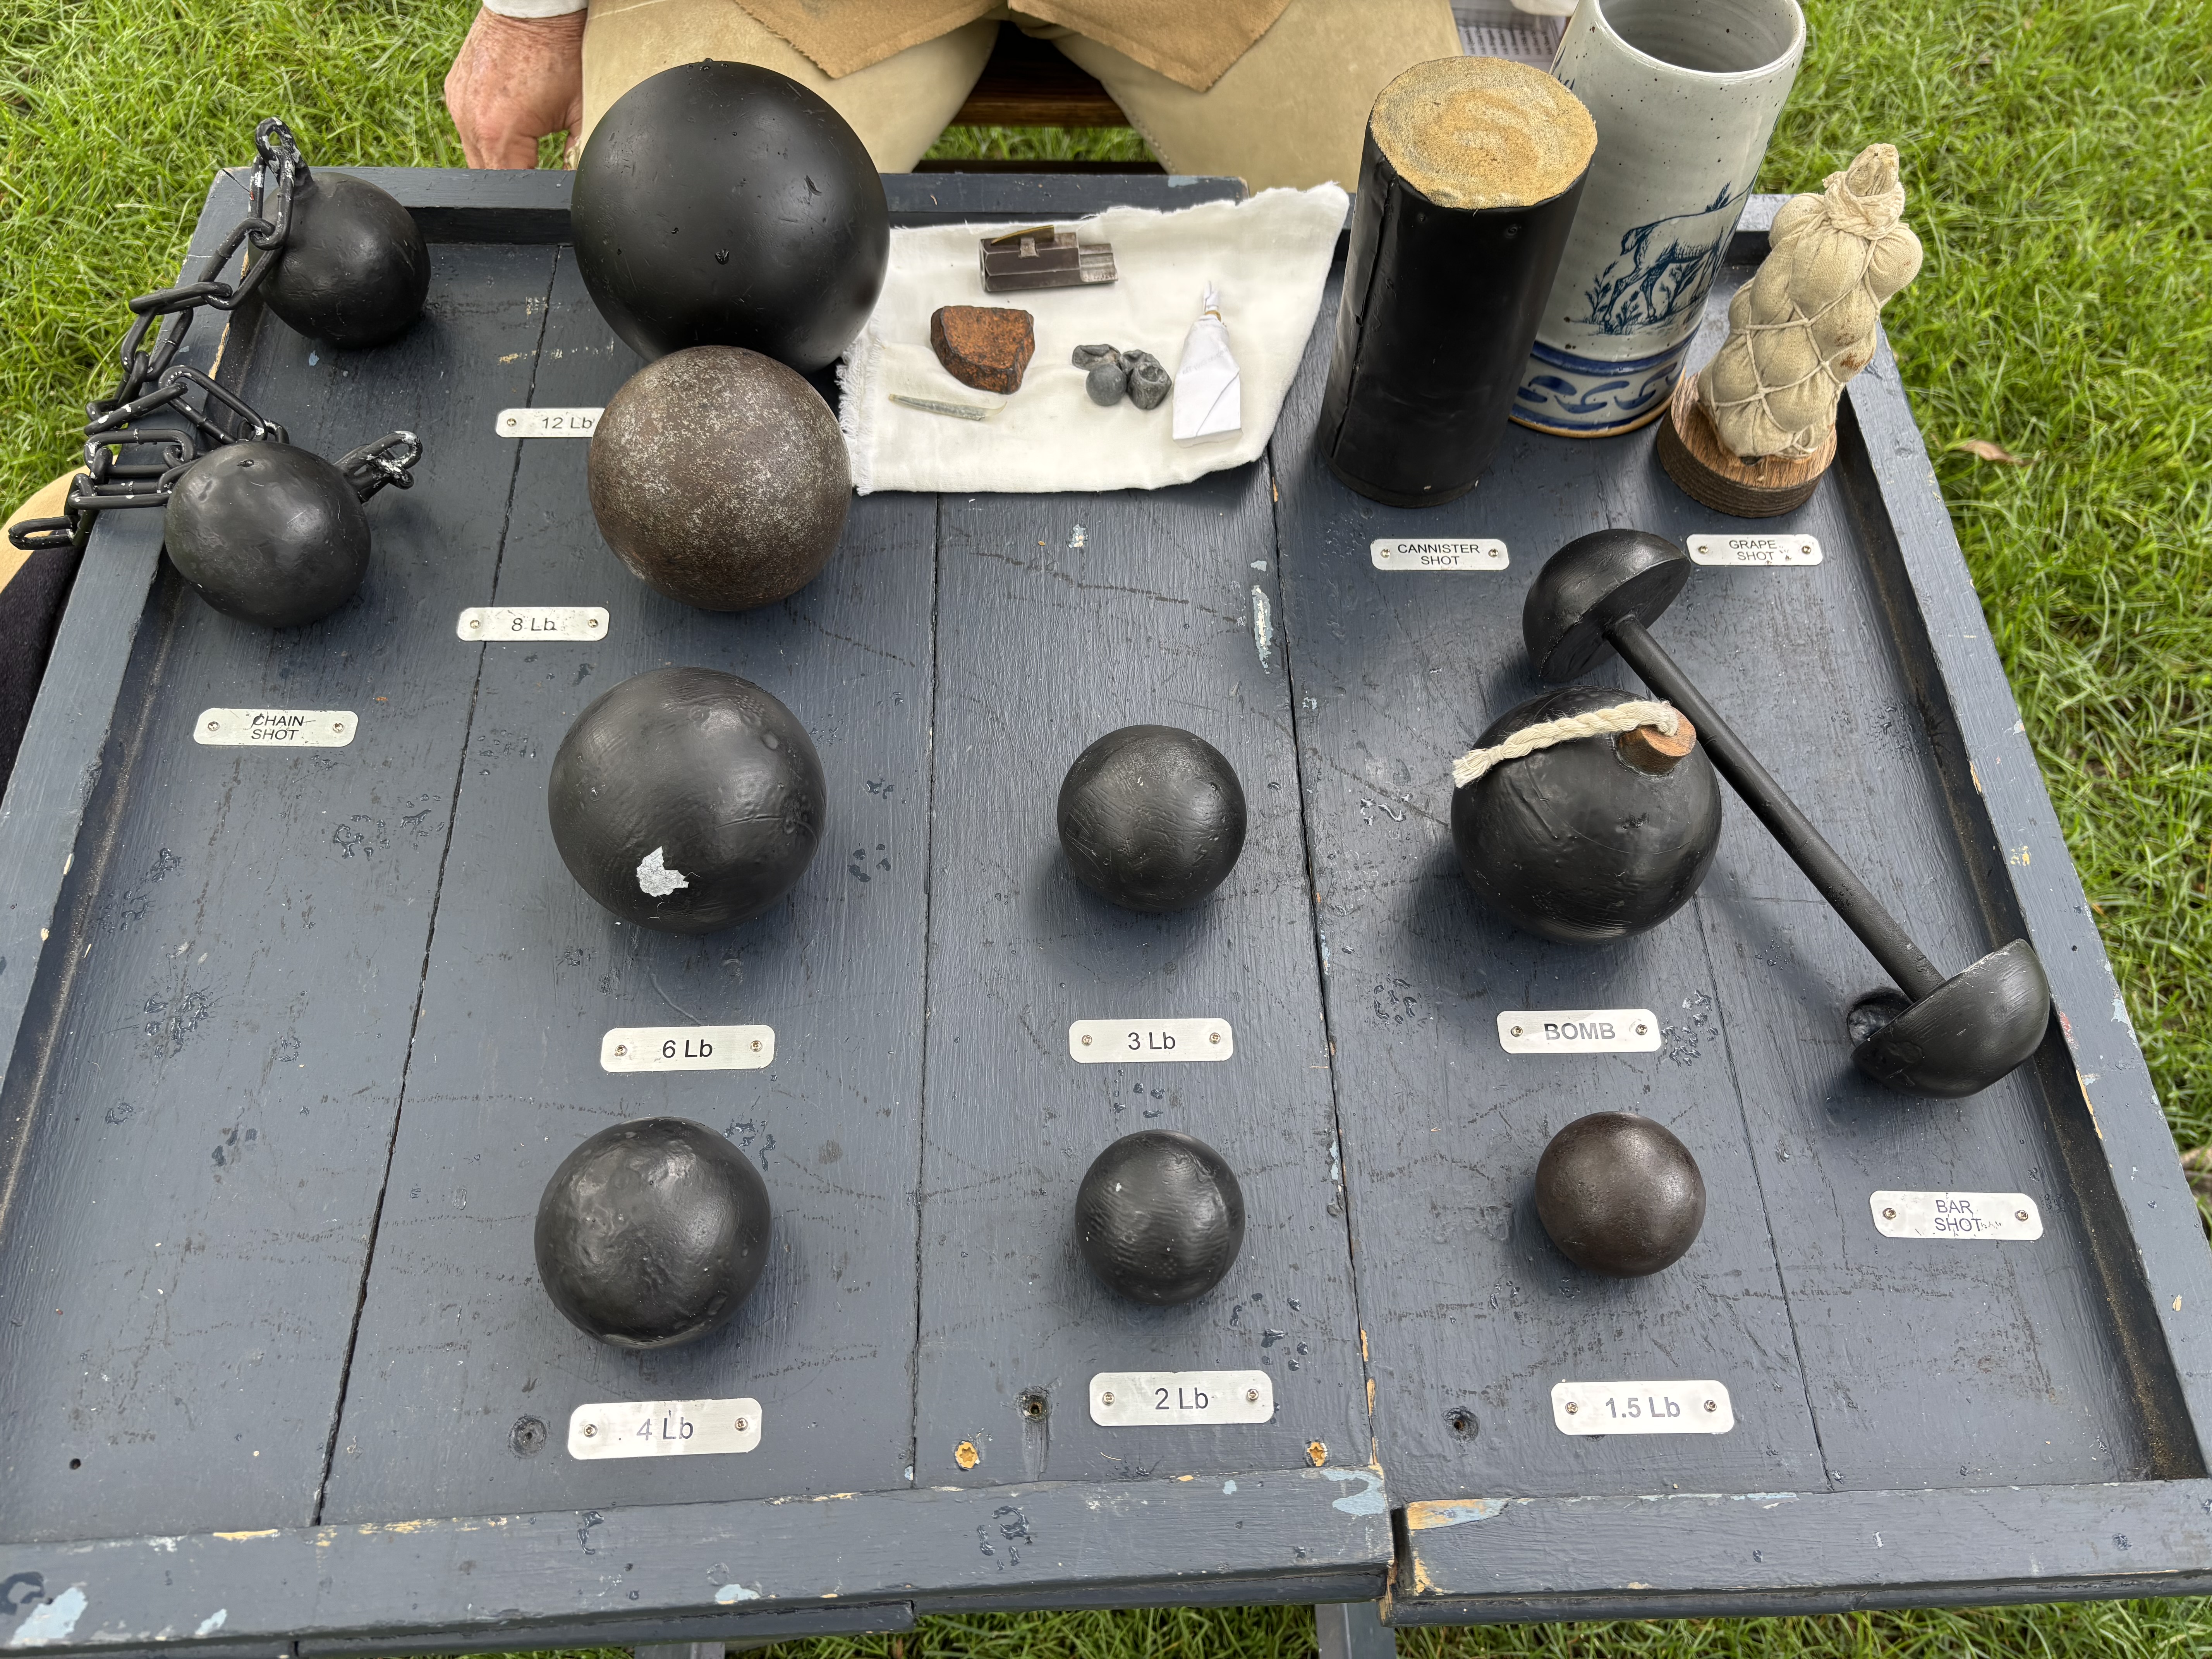
Cannon Balls at NWTA Cantigny 250 event, 14 June 2026 (Hamilton's Co'y New York State Art'y)
![]()

![]()
![]()

![]() Strategy Pure and Simple:
Strategy Pure and Simple:
![]()
Essential Moves for Winning in
Competition and Cooperation
![]()
![]()

![]() Strategic Advantage:
Strategic Advantage:
![]()
How to Win in War,
Business, and Life
![]()